 DataSheet
Award Winning Solutions
Xena has won multiple global awards for price/performance and technical innovation. Learn more.

Technical Expertise
Copyright © 2009-2026 Teledyne LeCroy Xena ApS, Denmark
: If the box does not show signs of life, the files may not be placed on the root of the SD card, or you used the wrong chipset firmware variant. Re-verify your processor model and reformat the card.
At 71 percent the bar stalled. Luis frowned. He glanced at the forum post again — comments warned about stalls, about leaving it alone. He debated pulling the power. In the end he left it to finish. Things that resisted control, he had learned, sometimes needed time.
Once the firmware package was downloaded, users would need to extract it and transfer it to an SD card formatted in FAT32. Alex recommended using a high-quality SD card with at least 8GB of free space.
You cannot simply copy the firmware file to the card; it must be flashed. mxq pro 4k firmware 71 2 download sd card free
You need a (4GB to 16GB, class 4 or 10). Do not use a USB drive – the bootloader of MXQ Pro 4K only triggers from the SD card slot during recovery.
: Gently pry open the plastic casing of your TV box to view the green circuit board (PCB).
Click to select your downloaded 7.1.2 firmware IMG file. : If the box does not show signs
Release the button. The box will automatically install the 7.1.2 firmware and reboot when finished. Troubleshooting Common Errors
To install Android 7.1.2 firmware on your MXQ Pro 4K Go to product viewer dialog for this item.
Release the button once you see an upgrade progress bar or the logo. Luis frowned
This article is a comprehensive guide on . It will cover identifying your device, downloading the correct files, and providing a detailed, step-by-step installation process using an SD card.
Flashing Android 7.1.2 on an using an SD card is a common way to recover "bricked" devices or improve performance. This process requires a specific firmware image (ROM) that matches your device’s internal hardware, such as the RK3229 or S905W chipset. 1. Preparation and Firmware Selection
Open your chip's specific tool (e.g., ). Select your SD card drive letter. Choose the downloaded firmware .img file. Click Make or Burn to make the card bootable.
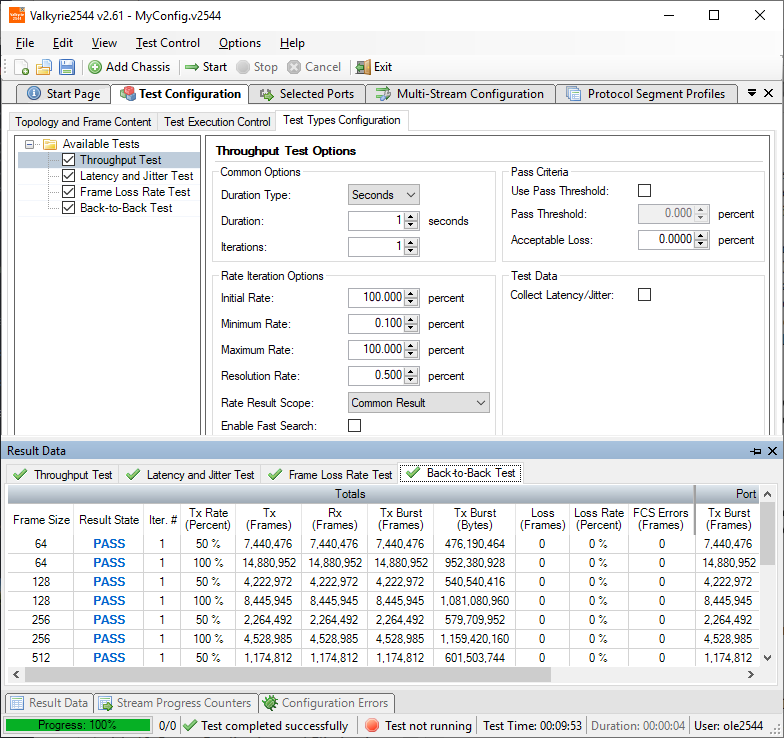
– Throughput
– Latency (FIFO, and LILO) for store-and-forward and cut-through DUTs
– Frame loss
– Back-to-back frames
– Ethernet,VLAN, Q-in-Q, MPLS, IPv4 and IPv6 frame support
– Automatic learning packets
– Custom field setting for any protocol
– Forwarding, including throughput and forwarding rates with a 16ns resolution
– Configurable maximum test rates
– L2 learning
– Repeat count
– Frame sizes same as stream
– Per test, per trial and per frame size learning
– Up to 5 chassis, 72 ports
– Full mesh, one-to-one, one-to-many, many-to-many
– Multi-port pair definitions, East/West
– Uni-directional or bi-directional testing
– Testing between any combination of port-speeds
Reports are available in PDF and .xml format.
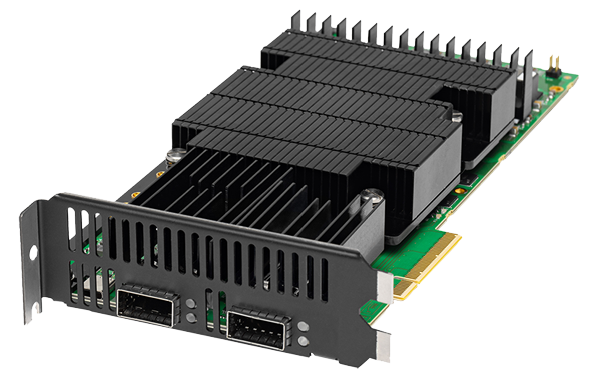
All Xena testers and all port speeds.
Test configuration files can be executed via CLI. Linux also supported via Mono framework.

Xena has won multiple global awards for price/performance and technical innovation. Learn more.
Copyright © 2009-2026 Teledyne LeCroy Xena ApS, Denmark